Monday, November 30, 2015

Mom and Betty... Old Friends!

The holidays are a time of family, friends and traditions.  I always think of my mother during this time when it comes to baking. There were always cookies in the house and my dad always had them in his lunch box. For years my dad had a black lunch box, much like the one shown below.  It was plastic and always smelled like the paper mill, which he worked at for 37 years. No matter what, there were always cookies in it and it always had cookie crumbs at the bottom.  For a time it was my job to clean it and get it ready for his lunch the next day. When he came home the lunchbox was cleaned and went on a shelf at the end of the cupboard and on his days off it went into the cupboard.   But always there were cookies in it.


Then there was the cookie jar.  I cant remember a time when the cookie jar wasn't on the counter.   It never left its place until after my dads passing.   Then it was given to my sister ,Linda.  She was raising her children at the time and it found a new home on her counter.


So where did moms cookie tradition start?   In our home there was one cookbook used for cookies, cake and pies.  AND that was Betty Crocker.   In 1950 Betty Crocker's Picture Cook Book was published. I don't know how she did it but mom had one.   Not sure if she saved up the money for it or if dad bought it for her.   Either way it very special for her to have in her possession.  In 1950 my parents were only married for 3 years with 2 children and one on the way.  Dad was working in the paper mill and holding down 2 other jobs.  So a cook book was a luxury for my mother.  It wasn't until many years later I understood how important the book was to her.  

In the days before computers and the internet everything was communicated in letters. Mom wasn't sure how to whip egg white so they formed a peak.  So she wrote Betty. Promptly Betty wrote back in the form of a typed letter explaining how to acheive the desired results.   Good old Betty, she was always there.  65 years later we still have the original typed letter.


Over the years Betty was truly loved.  As you can see from the picture above she is a little worn.  All of us girls used it at some points.  But I digress.  The cookies.  This is where they came from.  Chocolate chip cookies, peanut butter cookies, cherry winks, sugar cookies and of course my favorite... ice box cookies!   If you flip to anyone of those pages in the book you will find food stains and hand written notes from my mom. Betty was so loved she soon needed paper Hole punch protectors.


I thinks she is still in need of some.

So why am I saying all this.  Well, I saw a chocolate chip cookie on the internet I thought was interesting so I gave it a try.   It reminded me of mom and all the cookies she made.  Besides who needs a reason to have a cookie?  So I made a batch. 


They were good but not moms.  So it got me thinking about mom and good ole Betty.  50 years after the first publication of the Betty Crocker cook book they republished the cook book exactly as it was in 1950.  Why not?  Why fix what isn't broken.  It was a best seller in 1950 and basic cooking has never gone out of style.  So in 2000 mom purchased the cook book for all her kids.  So out came my Betty.


I promptly turned top page 204 for the peanut butter cookies.


Just like mom always made. Well almost.

After the chocolate chip and peanut butter it was time for the ice box cookies, or sometimes called refrigerator cookies.  On to page 184 I headed. There they were. The page looked exactly how I remembered.


Here is how it is written in the cook book...

Page 184 of the Betty Crocker Picture Cook Book
Refrigerator Cookies (melt in your mouth, rich and crispy)

Mix together thoroughly...
1 cup soft shortening (I used butter)
1/2 cup sugar
1/2 cup brown sugar
2 eggs

Sift together and stir in...
2 3/4 cup sifted flour
1/2 tsp soda
1 tsp salt
*2 to 3 tsp cinnamon
*Or use 1 1/2 tsp vanilla (add with eggs)

Mix thoroughly.  With hands press and mold into a long smooth roll about 2 1/2" in diameter.   Wrap with wax paper and chill until stiff (several hours of overnight.)  With a thin, sharp knife, cut in thin slices 1/8" to 1/16" thick.   Places slices a little apart on ungreased baking sheet. Bake until lightly brown.

Temperature: 400 degrees
Time: Bake 6 - 8 minutes
Amount: About 6 doz. 2 1/2" cookies.

As I made the cookies I remembered being a little girl in the kitchen with mom.  I was too little to see what mom was doing. I would get my step stool so I could see into the stand mixed which was silver. I can still hear mom say how important it was to cream the butter, sugar, egg and vanilla together.  When you think you have done it enough, you cream it some more. I still do that very thing.  I got to add the flour so the creaming seemed to take forever! Mom would always say when it was time for the flour. I was always ready. In a few short minutes the dough was ready to shape in a log.  The cookie logs always sat in the fridge overnight.  No short cuts. NEVER with ice box cookies. I felt like I hit the big time when she finally let me cut them before baking. Still my favorite part of making them. Moms seemed always to be the perfect thickness. I am still working on that part at age 51.

I will admit I am not a cookie connoisseur like my sister, Terry.  Nor am I the baker she is but I can make a mean ice box cookie!  Nothing better then a warm ice box cookie with an ice cold glass of whole milk. I become that little girl that had to use a step stool it see into the mixer every time.

After moms passing it was time for Betty to go to a new home. So she went to live with my sister, Terry, who proudly displays her on her bookshelf in the kitchen area. In time Betty will go to my niece, Anna, who is also an excellent cook. She and her daughter, Sakura, will carrying on the tradition of cookie making that started with a seemingly ordinary act of purchasing a cook book.

Some kitchens had Julia (Childs), some had Joy (the Joy of Cooking) but we had good ole Betty!

Time to make cookies for yourself or someone you love!

Monday, November 23, 2015

Meatballs... Search is Over on How to Cook Them.

I love love love meatballs!  BUT could never figure out how to make them that they weren't hard, dry and tasteless.   I just couldn't get it.   So after many many moons I finally figured it out. It took a bit to put it all together on what I was doing wrong. I had some left over ground chicken.  Instead of making chicken patties I decided to try meatballs. They turned out OK but not quit right.   I found a recipe online.  The flavor was good but they needed work. I was still missing something and didn't know what it was.  

Because I couldn't let it go, I remember the blog I wrote about how to cook a chicken breast that wasn't dry. No More Dry Chicken. Was that it?  Was I over cooking them?  I didn't have any ground chicken but I had a grinder and I had some chicken breast.  Ground the chicken, added seasoning and herbs only this time I got the pan hot with olive oil and dropped the meatballs into the pan and got them nice and brown.   Only this time I did not cook them all the way through.   When I was done browning them, I put them back in the pan with a nice homemade chicken gravy and cooked them slowly.  I HAD IT!!!  Not dry or hard like a hockey puck,  but still needed to work on the seasoning.   I realized it was more in the technique then anything.

Yet, I wasn't so sure about attempting meatballs with ground beef since it is a very different protein.  A friend's favorite meal is meatballs and spaghetti. He said I could do this.  I didn't need help on getting them to taste good because I learned that with the chicken meatballs. It was that texture I had to figure out with the ground beef.   So I hunted the internet for the answer.  And there it was.  HELLO!!!   I knew all the tips they gave me, I just never put them all together.

Here are the tips to a great meatball...
  • You want a good ground beef but not to lean.  The fat in the meat helps keep the protein moist while cooking.
  • I mince my garlic and onions and saute them. You don't want big pieced of onions in your meatball
  • Don't be afraid to use seasoning and herbs.   Added herbs and seasonings to your meat and do a taste test.   Fry up a little of the meat mixture in a pan to make sure the seasoning is right.
  • Every thing you add the to ground beef MUST BE COLD!!!!   When you saute your onions and garlic with your herbs and seasoning, place it in the fridge to cool it off. Regardless of the type of meat you use make sure everything is the same temperature when you combine it.  If you add the onion and spice mixture to the meat when it is hot you will start breaking down the protein in the meat.  You don't want that.
  • Do not over handle the meat.  Chicken is much looser then beef, port or lamb.  It seems like it wont hold its shape but it will.   You really cant over handle the chicken. You can, though, when  you are working with beef, pork and lamb.  You do not want to form the meat into tight perfectly round balls.  Doing that will make them dry and hard.
  • Do not over cook them.  You want to get a nice sear on them but not cooked all the way through.   You want them to finish cooking in your sauce on low.   This will keep them moist.
  • Eggs do not make the meatballs moist.  They are a binding agent.  Adding more will not help.
  • I use oatmeal to help bind everything together.   Like everything else there is a trick. You do not want to use the oats whole.   Put them in a food processor and give them a few spins with the blades.   You don't want them to be powder.   Just break them down a bit.

When you form the ball,  you do not want to over work them.  I use about 2- 3 tablespoons of meat.  You can use any amount you want.  It isn't about the size; it is in the technique.   Loosely form the meat into ball.  DO NOT squeeze the meat. I roll them back and forth between my hands with my fingers. Remember, there is not such thing as a perfectly round meatball except in the freezer section of the grocery store that were made by a machine.  I am suspicious of those things.

Next is cooking the meatball.  Again, you do not want to over cook the meatball.  Get your pan hot, add a little olive oil and add the meatballs.   Don't over crowd them.   Give them room to cook.  Once they are browned on one side start turning them until they are nicely brown all the way around. It doesn't take long to brown them, so keep an eye on them. Many people bake them in the oven but I find I have more control over the cooking process when I cook them in a pan on the stove.

In the recipe I have provided below, you can be used any meat combination.  All the tips above are the same for any meat used.


What is needed...
2 pounds ground beef
1/2 to 1 cup minced onion.   It is a preference thing.
2 - 3 tablespoons minced garlic
3 - 4 tablespoons minced herbs,   I use dill, parsley and basil
2 eggs
3/4 cup oats (before grinding)
Seasoning salt to taste
salt and pepper to taste

Here is what you do...
  • Saute onions and garlic.  Turn down the heat and add the seasoning and herbs to allow them to bloom.  Place in fridge to cool.
  • Grind the oats in the food processor
  • Once the onion mixture has cold and the same temperature as the meat, combine in a bowl with eggs and oats. Remember all the ingredients should be cold.
  • Get pan hot and add meatballs.  Sears on all sides.   Remove from pan.  They should not be cook all the way through.
  • Once all the meatballs have been cooked add them to your sauce to finish cooking through. At this point the cooking process is low and slow.   You do not want to burn your sauce or cook the meatballs too fast.
EAT UP!!!

You can make these ahead of time and freeze.  OR if you make too many, you can freeze them for another meal.  You do not have to finish cooking them before you freeze them. Place them in a zip lock bag.  They will be perfect when you take them out.

Experiment with different combinations of meat.   Growing up we used ground beef but I know many grew up with ground beef and pork.  Some have used veal.  Really is a personal choice.

Now go make something you love for yourself or someone you love.  

Thursday, November 19, 2015

Cookies, Cookies, and more Cookies!!!!

Now that Halloween is over and the kids (and adults) have picked over the best pieces of candy, it's time to turn our thoughts to Thanksgiving and then Christmas. More cooking and baking are done at this time of the year than any other. Everything from cakes to pies, from cookies to breads will be lovingly put together for celebrations and gatherings of all kinds.

In honor of all the bakers out there who are considering their menus for family and friends, I thought it might be good to write about those traditions that are influenced by generations of people from all over the world. It seems to me that every country, every nationality has a cookie, a cake, and a bread that best describes them and their traditions. 

So over the next three weeks, I will bring you a cornucopia of tasty ideas for your holiday table. Maybe you have your own traditions that have been handed down for generations. Or maybe you are just starting out and are beginning your own traditions. Either way, it is fun and interesting to learn what is happening in kitchens all around the world. I know we will find that we have more in common than we might think. 

This week we begin with cookies.  I have been part of many cookie swaps over the years.  I guess you could say I'm one of those "cookies monsters."  You know the type.  "I've never met a cookie I didn't like."


Some of my favorites from childhood are chocolate chip cookies (with walnuts, of course), refrigerator cookies, shortbread, and, oh yes, those lovely pecan balls rolled in powdered sugar!!! (those are also known as Mexican or Italian Wedding Cookies, Russian Tea Cakes, Pecan Shortbread Powdered Sugar Cookies, or Pecan Powdered Sugar Drops) 

There are literally hundreds of cookies out there that are part of cultures we may never get to know, but that doesn't mean we can't enjoy the baking and eating of these wonderful delights. Here's just a short list of cookies from all over that might be intriguing for you to look into:

  • Lebkuchen (German Christmas Cookies) are believed to be invented by monks in Franconia, Germany in the 13th century.
  • Danish Crispies are made with yeast so they are sort of like bread and sort of like cookies.


  • Struffoli are small fried pieces of dough that are coated with honey.  Crunchy and light and delish!


  • Swiss Zimtsterne are star shaped cookies with a lovely cinnamon flavor.


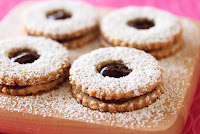
  • Austrian Linzer Cookies give you the pleasure of raspberry and toasted almonds in a beautiful sandwich style cookie.


  • Sicilian Cuccidati are fig cookies.   These beauties are name for Christmas, which is what cuccidati means.


  • Glazed Pfeffernuese cookies bring honey, spices and powdered sugar together in one delicious treat.


And that brings us to today's recipe from my kitchen.  I've always loved the butter, melt-in-your-mouth goodness of these lovelies.  They are easy and take very little time to make.  Be careful, though, as easy as these are to make, they are even easier to eat.  You and your guest will be delighted in the results.  And so we make Russian Tea Cakes:


What you need:
1 cup butter, softened
1 cup powdered sugar (and more for coating)
1 teaspoon vanilla
1/2 cup finely chopped pecans
1 3/4 cups flour
1/2 teaspoon salt


What you need to do:
In a large, deep bowl cream butter, powdered sugar and vanilla until smooth.  Add pecans and mix. Add salt and flour and mix to combine.  The dough will be soft.  Place it in refrigerator for 30 minutes.

Shape dough into balls, one inch in diameter.  Place on cookie sheet about 1 inch apart.  Bake for 12-13 minutes, but do not let them brown.  Remove and cool for 1 minute.

Quickly roll warm cookies in powdered sugar.  Allow to cool completely and roll in powdered sugar again. You should get approximately 30 cookies.

Tis the season, everyone.  It's time to make cookies as part of your party and celebration activities. Try something new.

Now, go out and make something good!


Monday, November 16, 2015

What a dinner party!

What a great vacation we had in Florida.   Terry came to see me for a week.  It was time for my sister to meet some close friends I have made in the time I have been in Florida.   Everyone has heard about each other so it was time to meet.  What better way to introduce everyone then over dinner.

I decided it was time to revive the dinner party I had when I was still in Wisconsin.   My sister rented a beautiful place in Safety Harbor.   The historical Carriage House.   It was perfect.  Space was amazing for a dinner party of 9.


We were lucky to have all the amenities.  We were able to use the items in the house that were already there.  Nice and simpler.  Everyone was close but still had room to dive in...LOL!

Because this was our 4th dinner party but our first in Florida, no one knew what to expect. All I told them was to wear stretchy pants and have empty tummies.   

Like always, we tried to keep the menu simple but it never turns out that way.

Here is what was on the menu...

Cepresi Salad with a Zucchini Spiral stuffed with Brie and a variety of veggies 


Garden salad with homemade Roasted Garlic Dressing

Cream of Mushroom Soup

Seafood Pasta

Mango Palette Cleanser

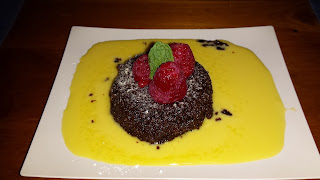
Chocolate Lava Cake with Creme Anglaise

Happy faces and full tummies!
Thanks everyone for the great time, great conversation and lots of laughs!  It was decided that we will do it all over again next year.  Same time, same place with a new menu!